Embarking on the journey of how to shoot creative self portraits offers a profound opportunity for introspection and artistic expression. This guide is meticulously crafted to illuminate the path for photographers seeking to transcend conventional self-representation and delve into the realm of truly unique and compelling self-portraits. We will explore the fundamental principles that distinguish artistic self-portraits from simple snapshots, emphasizing the crucial role of intention, personal vision, and imaginative conceptualization.
From understanding the core essence of creative self-portraits to mastering essential equipment, lighting techniques, and post-processing magic, this comprehensive exploration is designed to empower you. We will delve into developing captivating concepts, effective posing, impactful composition, and overcoming common creative hurdles, ensuring you possess the knowledge and skills to bring your artistic self-portraits to life with confidence and flair.
Understanding the Core Concept of Creative Self-Portraits
Creative self-portraits are a powerful form of visual storytelling where the artist uses their own image as the subject to convey a deeper meaning, emotion, or concept. Unlike a standard photograph of oneself, which primarily aims for accurate representation, a creative self-portrait delves into the artist’s inner world, inviting the viewer to connect with a narrative or idea. This distinction lies in the deliberate artistic choices made to evoke a specific response or communicate a unique perspective.The essence of a creative self-portrait is rooted in intention and personal expression.
It is an opportunity to explore identity, explore abstract thoughts, or comment on societal themes through the lens of one’s own physicality and presence. This deliberate approach transforms the act of being photographed into a conscious act of creation, where every element, from lighting and composition to props and post-processing, serves a purpose in articulating the artist’s vision.
Differentiating from Standard Self-Portraits
A standard self-portrait typically focuses on capturing a likeness, often in a straightforward manner. Think of a passport photo or a casual selfie taken to document a moment. The primary goal is often recognition and straightforward documentation. In contrast, a creative self-portrait moves beyond mere likeness to explore symbolic representation and artistic interpretation. The artist may distort their appearance, use unconventional settings, or incorporate elements that suggest a narrative or emotional state.
The Importance of Intention and Personal Expression
Intention is the guiding force behind a compelling creative self-portrait. It’s the “why” behind the image. Are you aiming to express feelings of isolation, joy, strength, or vulnerability? Do you want to explore a specific theme like transformation, societal pressure, or the passage of time? This clear intention informs every creative decision.
Personal expression is what makes the self-portrait uniquely yours. It’s about infusing the image with your personality, your experiences, and your unique way of seeing the world. This authenticity is what resonates with viewers and elevates the photograph from a mere picture to a work of art.
Conceptualizing Beyond Simple Representation
Conceptualizing a creative self-portrait involves moving beyond simply pointing a camera at yourself. It requires a thoughtful process of idea generation and development. This can involve brainstorming themes, exploring metaphors, and considering how visual elements can best communicate your intended message.Here are several approaches to conceptualizing a self-portrait that transcends simple representation:
- Symbolic Representation: Incorporate objects, colors, or settings that carry symbolic meaning related to your concept. For instance, a bird might symbolize freedom, water could represent emotion, or a stark, empty room might convey loneliness.
- Narrative Storytelling: Create a scene that implies a story or a moment within a larger narrative. This might involve staged actions, implied interactions with unseen elements, or the use of props that suggest a past or future event.
- Emotional Exploration: Focus on conveying a specific emotion through facial expression, body language, and the overall mood of the image. Lighting and color grading play a crucial role here. For example, soft, warm lighting might evoke comfort, while harsh, contrasting light could suggest tension.
- Abstract Concepts: Translate abstract ideas like time, memory, or dreams into visual form. This might involve blurring, layering, or distorting the image to create a surreal or dreamlike effect.
- Identity Exploration: Use the self-portrait to question or deconstruct aspects of your identity. This could involve playing with gender roles, exploring cultural heritage, or representing different facets of your personality.
Consider the work of artists like Cindy Sherman, who uses self-portraiture to explore various female archetypes and societal representations, or Francesca Woodman, whose ethereal and often fragmented self-portraits delve into themes of the female body, vulnerability, and the ephemeral nature of existence. Their intentional use of self as a medium to explore broader societal and psychological themes exemplifies creative self-portraiture at its finest.
Essential Equipment and Setup for Self-Portraiture

Embarking on creative self-portraiture requires a thoughtful selection of equipment and a well-considered setup. While artistic vision is paramount, the right tools can significantly enhance your ability to bring those visions to life. This section will guide you through the essential gear and how to arrange your shooting environment for optimal results.The foundation of compelling self-portraits lies in having the right tools that empower your creative expression.
From the camera itself to the way you illuminate your subject – which in this case is you – every element plays a crucial role in shaping the final image. Understanding these components will allow you to overcome technical hurdles and focus on the artistic narrative.
Camera Gear Recommendations
Choosing the right camera is a significant step, and it’s important to consider that excellent self-portraits can be achieved across a range of budgets. The key is to understand the features that are most beneficial for this type of photography.For those starting out or working with a limited budget, a smartphone with a good quality camera can be surprisingly capable.
Modern smartphones often feature advanced image processing and manual control options through third-party apps, allowing for a great deal of creative freedom.
| Budget Level | Recommended Gear | Key Features for Self-Portraiture |
|---|---|---|
| Entry-Level (Smartphone) | Smartphone with advanced camera capabilities | Good low-light performance, manual control apps, wide-angle lens options. |
| Mid-Range (DSLR/Mirrorless) | Entry-level DSLR or Mirrorless camera (e.g., Canon EOS Rebel series, Nikon D3500, Sony a6000 series) | Interchangeable lenses, better sensor size for image quality, external flash compatibility, articulating screen for easier framing. |
| Advanced (DSLR/Mirrorless) | Mid-range to professional DSLR or Mirrorless camera (e.g., Canon EOS R series, Nikon Z series, Sony Alpha series) | Larger sensors (APS-C or Full-Frame) for superior image quality and low-light performance, advanced autofocus, higher frame rates, robust build quality. |
When selecting a camera, look for features like an articulating or tilt-and-swivel screen, which is invaluable for composing your shots when you’re behind the lens. Wi-Fi or Bluetooth connectivity can also be very helpful for transferring images to your phone or tablet for quick review.
The Role of Lighting in Self-Portraits
Lighting is arguably the most critical element in photography, and for self-portraits, it’s your primary tool for sculpting your own image and conveying mood. Whether you’re utilizing the sun’s rays or artificial sources, understanding light’s behavior is essential.
Natural Light Techniques
Natural light offers a beautiful, soft, and often flattering quality that is readily available. The direction and quality of natural light can dramatically alter the mood and dimension of your self-portrait.
- Window Light: Position yourself near a window. The light will typically be soft and diffused, creating a gentle illumination. Experiment with positioning yourself directly in front of the window (front lighting), to the side (side lighting, creating shadows and depth), or with the window behind you (backlighting, for a rim light effect).
- Golden Hour: The period shortly after sunrise and before sunset provides warm, soft, and directional light that is exceptionally flattering. This light can add a magical glow and rich colors to your self-portraits.
- Overcast Days: Cloudy skies act as a giant diffuser, providing soft, even light that minimizes harsh shadows. This is an excellent condition for portraits where you want a smooth, consistent look.
Artificial Lighting Setups
Artificial lighting gives you greater control over the light’s intensity, color, and direction, allowing for more deliberate creative choices.
- Single Light Source: A single continuous light (like an LED panel or a speedlight) can be used to mimic natural light patterns. By moving the light source around you, you can create various lighting effects such as Rembrandt lighting (a triangle of light on the shadowed cheek), loop lighting, or butterfly lighting.
- Softboxes and Umbrellas: These light modifiers are essential for creating soft, diffused light. A softbox will create a more controlled, rectangular light source, while an umbrella will spread light more broadly. Using these with your artificial light source will significantly reduce harsh shadows and create a more pleasing, professional look.
- Backdrops and Backgrounds: While not strictly lighting, a simple backdrop (a plain wall, a sheet, or a dedicated photography backdrop) can help isolate you and ensure the focus remains on your portrait, preventing distracting elements from the environment.
“Light is the painter’s brush, and the subject is the canvas.”
Essential Accessories for Self-Portraiture
Beyond the camera and lighting, several accessories are indispensable for making self-portraiture a smooth and efficient process. These tools allow you to achieve stable shots, precise framing, and creative control without an assistant.
- Tripod: A sturdy tripod is non-negotiable for self-portraits. It provides a stable platform for your camera, allowing you to use slower shutter speeds without camera shake and ensuring consistent framing between shots. Look for a tripod with adjustable height and a ball head for easy angle adjustments.
- Remote Shutter Release: This accessory allows you to trigger the camera shutter without touching it, preventing any movement that could blur the image. This can be a physical remote, a wireless trigger, or even your smartphone if your camera has Wi-Fi capabilities.
- Intervalometer: For sequences of shots or time-lapse self-portraits, an intervalometer (often built into cameras or available as an accessory) allows you to program the camera to take photos at set intervals.
- Camera App on Smartphone: Many camera manufacturers offer smartphone apps that connect to your camera. These apps often allow you to control the shutter, adjust settings, and even preview the shot on your phone, acting as a wireless remote and monitor.
- External Monitor (Optional): For more critical framing and focus, especially in low light or when shooting video, an external monitor connected to your camera can be a valuable addition.
Basic Studio Setup with Household Items
Creating a dedicated studio space for self-portraits doesn’t require expensive equipment. With a bit of creativity, you can fashion a functional setup using common household items.
Creating a backdrop:
- Plain Wall: The simplest and most effective backdrop is a clean, unadorned wall in your home.
- Sheets or Fabric: A large, wrinkle-free sheet or a piece of fabric can be hung from a wall or a makeshift frame (e.g., using chairs or a clothes rack) to create a seamless background. Ironing out wrinkles will significantly improve the final look.
- Cardboard or Poster Board: Large sheets of cardboard or poster board can be used for smaller, more focused backdrops, especially for close-up portraits.
Setting up lighting:
- Desk Lamps: Position desk lamps strategically. You can diffuse the light by placing a thin white cloth or a piece of parchment paper in front of the bulb (ensure it’s not too close to avoid heat issues).
- Natural Light from Windows: As discussed earlier, windows are excellent light sources. Arrange your “studio” area near a window for natural illumination.
- Reflectors: A piece of white cardboard, foam board, or even a white bedsheet can be used to bounce light back onto the shadowed side of your face, filling in shadows and softening the contrast.
Camera Placement:
- Chairs or Stacks of Books: Use sturdy chairs or stacks of books to elevate your camera to the desired height if your tripod doesn’t reach high enough. Ensure the surface is stable.
- DIY Camera Mount: In a pinch, you can place your camera on a stable surface like a table or a stack of books, using other items to prop it up at the correct angle.
By thoughtfully combining these elements, you can establish a functional and creative self-portrait studio within your own home, opening up a world of photographic possibilities.
Posing and Expression Techniques for Impactful Self-Portraits
Crafting a compelling self-portrait goes beyond simply pointing the camera at yourself; it involves a thoughtful exploration of your inner world and how to visually translate it. Posing and expression are the cornerstones of this translation, allowing you to guide the viewer’s interpretation and evoke a specific emotional response. This section delves into techniques that will elevate your self-portraits from mere documentation to powerful visual narratives.Mastering the art of posing and expression requires an understanding of how subtle shifts in body language and facial muscles can dramatically alter the mood and story of an image.
It’s about becoming both the subject and the director, orchestrating a visual symphony that resonates with your intended message.
Posing Techniques for Mood Enhancement
The way you position your body can speak volumes, setting the tone and atmosphere for your self-portrait. Different poses can evoke feelings of confidence, vulnerability, introspection, or joy. Experimenting with these techniques allows you to communicate complex emotions without uttering a single word.Here are several posing techniques that can significantly enhance the mood of your self-portraits:
- The Contemplative Lean: Gently leaning your head on your hand or resting your elbow on a surface, with a slightly downward gaze, can convey thoughtfulness, introspection, or even a touch of melancholy. This pose invites the viewer to wonder about your thoughts.
- The Empowered Stance: Standing tall with shoulders back, chest slightly forward, and a direct gaze can project confidence and strength. Variations include placing one hand on your hip or crossing your arms, which can add an element of assertiveness.
- The Vulnerable Curl: Slightly hunching your shoulders, tucking your chin, or drawing your knees towards your chest can create a sense of vulnerability, shyness, or introspection. This pose often elicits empathy from the viewer.
- The Dynamic Movement: Capturing yourself in motion, such as mid-stride, reaching, or turning, can inject energy and dynamism into your portrait. This is particularly effective for conveying a sense of freedom, action, or excitement.
- The Relaxed Slouch: A more casual, relaxed posture, perhaps sitting or leaning against a wall with loose limbs, can communicate comfort, ease, or a laid-back attitude.
Capturing Authentic and Expressive Facial Expressions
Facial expressions are the most direct channel for conveying emotion in a self-portrait. Achieving authenticity requires moving beyond forced smiles and exploring a range of genuine feelings. This often involves connecting with the emotion you wish to portray and allowing it to naturally manifest on your face.Methods for capturing authentic and expressive facial expressions include:
- Connecting with the Emotion: Before you shoot, spend time reflecting on the emotion you want to convey. Think about memories, situations, or feelings that evoke that emotion. This internal connection will translate into a more genuine expression.
- The Power of the Eyes: Your eyes are often called the windows to the soul. Experiment with different eye contact levels – direct gaze, looking away, or a soft, unfocused stare – to convey a spectrum of emotions from defiance to wistfulness.
- Subtle Mouth Movements: A slight smile, a gentle frown, pursed lips, or an open mouth can drastically change the emotional impact. Avoid a wide, toothy grin unless it genuinely reflects the mood; often, a more subtle expression is more powerful.
- Relaxing the Face: Tension in the face can lead to stiff and unnatural expressions. Practice relaxing your jaw, forehead, and the muscles around your eyes. Deep breaths can help release tension.
- Observing and Practicing: Spend time observing your own expressions in a mirror. Practice conveying different emotions and see how your face naturally reacts. This self-awareness is invaluable.
- The “Laughing” Technique: Sometimes, simply saying “ha ha ha” out loud can trigger a genuine, albeit fleeting, smile or laugh that can be captured. This often results in a more natural expression than asking yourself to “smile.”
Using Body Language and Posture for Narrative
Your body is a powerful storytelling tool in self-portraits. The way you hold yourself, the angle of your body, and the placement of your limbs all contribute to the narrative you are creating. Understanding how to use your body effectively can transform a static image into a dynamic story.Consider these aspects of body language and posture to tell a story within the frame:
- The Diagonal Line: Angling your body in a diagonal line across the frame often creates a more dynamic and engaging composition than a straight-on frontal pose. This can suggest movement or a sense of being in the midst of something.
- Hand Placement: Hands can convey a multitude of emotions. They can be used to frame the face, touch the body, gesture, or rest in a relaxed manner. Consider what your hands are doing and how it contributes to the overall message. For instance, hands clasped tightly might suggest anxiety, while open palms can convey honesty or welcome.
- Shoulder and Hip Alignment: A slight twist of the shoulders away from the camera, with hips turned towards it (or vice versa), creates a more flattering and dynamic shape. This contrapposto effect adds visual interest and depth.
- The “Weight Shift”: Shifting your weight onto one leg, with the other leg slightly bent or extended, creates a more natural and relaxed posture. This avoids the stiff appearance of standing with both feet evenly planted.
- Interaction with the Environment: How you interact with your surroundings—leaning against a wall, touching a prop, or sitting on a surface—can add layers to your narrative. This integration makes the portrait feel more grounded and contextual.
Dynamic Versus Static Poses for Narrative Effects
The choice between a dynamic and a static pose significantly influences the narrative and emotional impact of your self-portrait. Each serves a distinct purpose and can be used strategically to achieve different storytelling effects.Here’s a comparison of dynamic and static poses and their narrative implications:
- Static Poses: These are poses where the subject is held still, often with a sense of calm, permanence, or contemplation. They are excellent for conveying:
- Introspection and Reflection: A still, thoughtful pose encourages the viewer to ponder the subject’s inner state.
- Serenity and Peace: A calm, unmoving pose can evoke a sense of tranquility.
- Timelessness: Static poses can feel almost like a classic portrait, suggesting a moment frozen in time.
- Strength and Stability: A grounded, unwavering stance can communicate resilience.
For example, a portrait of someone sitting perfectly still with a serene expression, looking directly at the camera, would be considered a static pose aiming for a sense of calm contemplation.
- Dynamic Poses: These poses involve movement, energy, and a sense of action or transition. They are ideal for expressing:
- Energy and Vitality: Capturing motion conveys liveliness and enthusiasm.
- Freedom and Spontaneity: Poses that suggest movement can evoke a feeling of liberation.
- Narrative Progression: Dynamic poses can imply a story unfolding or a moment of change.
- Emotion and Intensity: The intensity of an emotion can be amplified through active, engaged body language.
Consider a self-portrait where you are captured mid-leap, arms outstretched, with a joyful expression. This dynamic pose communicates exhilaration and freedom. Another example could be a portrait of you in the process of turning your head, with a determined look, suggesting a shift in focus or a moment of realization.
The strategic use of both dynamic and static poses allows you to control the narrative and emotional resonance of your self-portraits, offering a versatile toolkit for creative expression.
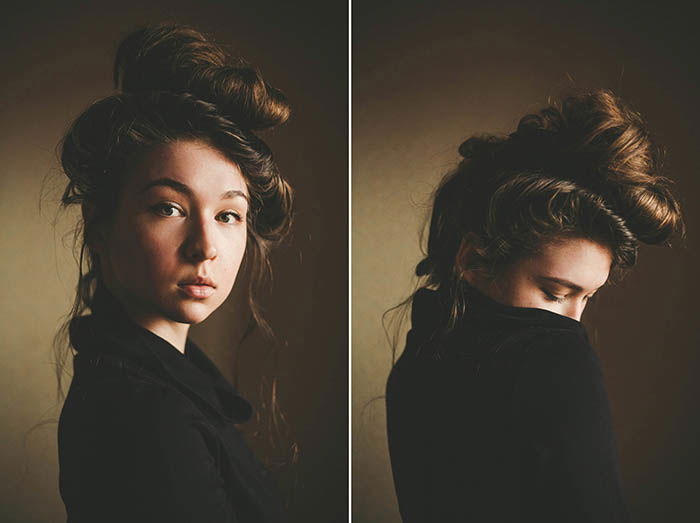
Lighting and Composition Strategies for Artistic Self-Portraits

Mastering lighting and composition is paramount to elevating your self-portraits from mere snapshots to compelling works of art. These elements work in tandem to shape mood, emphasize form, and guide the viewer’s eye, transforming a simple image into a narrative. This section delves into advanced lighting techniques and fundamental compositional principles, demonstrating how to apply them creatively to your self-portraiture.
Post-Processing and Editing for Enhanced Self-Portraits
The journey of creating a compelling self-portrait doesn’t conclude with the click of the shutter; it extends into the realm of post-processing and editing. This crucial stage allows you to refine your vision, enhance the mood, and imbue your images with a professional polish. By strategically employing editing techniques, you can transform a good photograph into a truly captivating piece of art.Editing is where your artistic intent truly takes flight.
It’s not about altering reality drastically, but rather about accentuating the emotions, textures, and narratives you’ve carefully constructed during the shooting process. Think of it as the final brushstroke on your canvas, bringing out the subtle nuances and overall impact of your self-portrait.
Essential Editing Steps for Self-Portraits
Before diving into stylistic choices, a solid foundation of technical adjustments is paramount. These steps ensure your self-portrait is technically sound and visually pleasing, providing a strong base for further creative enhancements.
- Color Correction: This involves adjusting white balance to ensure colors appear natural and accurate, as well as correcting any color casts that may have occurred due to lighting conditions. Proper color correction makes the image feel more grounded and believable.
- Contrast Adjustment: Fine-tuning contrast helps to define the shapes and textures within your self-portrait. Increasing contrast can add drama and depth, while decreasing it can create a softer, more ethereal feel. This impacts how the viewer perceives the form and mood of the subject.
- Exposure and Brightness: Ensuring the overall brightness of the image is balanced is key. This might involve lightening shadows to reveal detail or darkening highlights to prevent blown-out areas, ensuring all elements are visible and contribute to the narrative.
- Sharpening: Applying a controlled amount of sharpening can bring out finer details in your self-portrait, such as the texture of skin, fabric, or background elements. Over-sharpening, however, can lead to an unnatural, pixelated look.
- Retouching: This can range from subtle blemish removal to more significant skin smoothing. The goal is typically to enhance the subject’s appearance without making them look artificial. Techniques like frequency separation can be used for advanced skin retouching, preserving natural skin texture.
Enhancing Mood and Artistic Vision with Editing Software
Editing software offers a powerful toolkit to translate your creative vision into the final image. Beyond basic corrections, these tools allow for sophisticated manipulations that define the emotional resonance and aesthetic style of your self-portrait.
Color Grading for Mood Setting
Color grading is one of the most impactful ways to establish a specific mood or atmosphere. By shifting the overall color palette, you can evoke different emotions and tell a story.
- Warm Tones: Introducing warm hues like oranges, yellows, and reds can create a feeling of comfort, nostalgia, or passion. This is often used for portraits aiming for an intimate or cozy feel.
- Cool Tones: Blues, greens, and purples can evoke a sense of calm, melancholy, mystery, or even a futuristic aesthetic. These tones are effective for creating a more dramatic or introspective mood.
- Monochromatic or Desaturated Palettes: Reducing the saturation or converting an image to black and white can lend a timeless, classic, or dramatic quality. It forces the viewer to focus on form, light, and shadow rather than color distractions.
Dodging and Burning for Emphasis
Dodging and burning are classic darkroom techniques that translate effectively into digital editing. They involve selectively lightening (dodging) and darkening (burning) areas of an image to guide the viewer’s eye and sculpt the subject.
- Highlighting Key Features: Dodging can be used to subtly brighten eyes, lips, or other facial features, drawing attention to them.
- Creating Depth and Dimension: Burning can be used to darken edges of the frame or background elements, pushing them back and making the subject stand out more prominently.
- Sculpting Form: Strategic dodging and burning can enhance the natural contours of the face and body, adding a sense of three-dimensionality and volume.
Creative Effects and Textures
Beyond color and light manipulation, editing software allows for the integration of creative effects and textures to further enhance the artistic narrative.
- Vignettes: A subtle darkening of the corners of an image can help to draw the viewer’s focus towards the center, where the subject is typically located.
- Grain and Noise: Adding film grain can impart a vintage or artistic feel, while controlled noise can sometimes add a gritty texture.
- Overlays and Textures: Applying textures like paper, fabric, or abstract patterns can add layers of visual interest and complexity to the self-portrait, creating a unique artistic signature.
Comparison of Editing Styles and Their Impact
The approach to editing can dramatically alter the perception and impact of a self-portrait. Different styles appeal to different artistic sensibilities and can convey distinct messages.
| Editing Style | Characteristics | Impact on Self-Portrait | Example Application |
|---|---|---|---|
| Naturalistic | Subtle adjustments, minimal retouching, accurate color representation. Focus on enhancing reality without altering it significantly. | Creates a relatable and authentic feel. The viewer connects with the subject on a more personal level. | Documentary-style self-portraits, or when aiming for a raw, unvarnished depiction. |
| Cinematic | Bold color grading, dramatic contrast, often with a specific color palette (e.g., teal and orange). Emphasis on mood and storytelling. | Evokes a strong emotional response and narrative. The self-portrait feels like a still from a film. | Conceptual self-portraits with a strong narrative, or when aiming for a high-impact, stylized look. |
| Vintage/Retro | Simulated film grain, desaturated colors, warm or muted tones, sometimes soft focus. | Conveys nostalgia, timelessness, or a specific historical era. Creates a sense of artistic heritage. | Self-portraits inspired by historical photography or when seeking a classic aesthetic. |
| Surreal/Artistic | Significant manipulation of colors, light, and even form. May involve compositing or unusual effects. | Challenges perception and sparks imagination. The self-portrait becomes a piece of fine art that goes beyond representation. | Conceptual self-portraits exploring abstract ideas, dreams, or the subconscious. |
Creating a Cohesive Visual Style Across a Series
Consistency in editing is vital when presenting a series of self-portraits. A unified visual style creates a stronger, more memorable body of work and reinforces your artistic identity.
- Develop a Preset: Once you’ve refined your editing process for one self-portrait, save those settings as a preset in your editing software. This ensures that subsequent images in the series are processed with the same core adjustments.
- Consistent Color Palette: Establish a dominant color palette that you will use across all images. This could be achieved through consistent color grading or by ensuring that the natural colors in your shots align with your chosen theme.
- Uniform Contrast and Brightness: Aim for a similar level of contrast and overall brightness in each image. This creates a harmonious flow between the photographs when viewed together.
- Controlled Retouching: If you retouch your skin or other elements, maintain a consistent level of intensity and technique. Over-retouching one image while leaving another natural will break the visual unity.
- Apply Similar Creative Effects: If you use specific effects like vignettes, grain, or overlays, apply them with a consistent intensity and placement across the series. This reinforces the stylistic signature of your work.
- Review and Adjust: Periodically review your series as a whole to ensure consistency. Minor adjustments may be needed on individual images to bring them into closer alignment with the established style, but always refer back to your core preset as a starting point.
Exploring Different Styles and Genres of Self-Portraiture
Self-portraiture is a dynamic and versatile art form, offering boundless opportunities for creative expression. Beyond simply capturing one’s likeness, it allows for the exploration of ideas, emotions, and artistic concepts. By venturing into different styles and genres, you can significantly broaden your creative horizons and develop a more profound and unique photographic voice. This section delves into several distinct approaches to self-portraiture, encouraging you to experiment and discover new avenues for your artistic journey.Each genre of self-portraiture offers a unique lens through which to view and represent oneself.
Understanding these distinctions can help you choose the most effective style to convey your intended message or aesthetic. Whether you aim to provoke thought, evoke emotion, or simply explore visual aesthetics, there’s a genre of self-portraiture that can help you achieve your goals.
Conceptual Self-Portraits
Conceptual self-portraits move beyond mere representation to communicate a specific idea, emotion, or social commentary. These images often employ symbolism, metaphor, and narrative elements to engage the viewer on an intellectual and emotional level. The focus is less on the physical appearance of the subject and more on the underlying concept being conveyed.This genre invites photographers to think abstractly and to use their environment, props, and even their own body in unconventional ways to tell a story or pose a question.
It’s about creating a visual dialogue that encourages interpretation and reflection.Here are some approaches to creating impactful conceptual self-portraits:
- Symbolic Representation: Incorporate objects or elements that hold personal or universal symbolic meaning. For instance, a wilting flower could represent fading youth or a lost opportunity, while a key might symbolize unlocking potential or a hidden truth.
- Metaphorical Storytelling: Construct a scene that acts as a metaphor for a personal experience, a societal issue, or an abstract concept like freedom, confinement, or transformation.
- Juxtaposition and Contrast: Place elements together that create tension or highlight a particular idea. This could involve contrasting light and shadow, old and new, or natural and artificial elements.
- Performance and Action: Capture yourself in a specific action or pose that embodies the concept. This could involve an act of defiance, surrender, creation, or contemplation.
- Subverting Expectations: Challenge traditional notions of beauty, identity, or self-representation by presenting yourself in unexpected or unconventional ways.
Environmental Self-Portraits
Environmental self-portraits skillfully integrate the subject with their chosen surroundings, using the location as an integral part of the narrative or aesthetic. The environment is not merely a backdrop but an active participant in the portrait, contributing to the mood, context, and meaning of the image. This genre emphasizes the relationship between the individual and their world, whether it’s a natural landscape, an urban setting, or a personal space.The key to successful environmental self-portraits lies in finding a location that resonates with your intended message or personal identity and then composing the shot so that you and the environment feel harmoniously connected.Consider these elements when creating environmental self-portraits:
- Narrative Connection: Choose a location that tells a story about you, your work, your passions, or your current state of mind. A cluttered studio might speak to creativity and process, while a vast natural landscape could evoke feelings of solitude or exploration.
- Scale and Perspective: Play with the scale of your subject in relation to the environment. You might position yourself small against a grand vista to emphasize feelings of insignificance or awe, or fill the frame with a detail of the environment that reflects a personal characteristic.
- Light and Atmosphere: Utilize the natural light and atmospheric conditions of the location to enhance the mood. Golden hour light can create warmth and nostalgia, while a foggy or overcast day might lend a sense of mystery or melancholy.
- Interaction with the Environment: Pose in a way that suggests interaction with the surroundings. This could be as simple as leaning against a wall, sitting on a rock, or as complex as actively engaging with an element of the environment, such as tending to a plant or exploring a structure.
- Color Harmony and Contrast: Pay attention to the color palette of your clothing and the environment. Aim for harmony to blend in, or contrast to make yourself stand out as a focal point.
Abstract Self-Portraits
Abstract self-portraits move away from literal representation to explore the more subjective and artistic qualities of form, texture, color, and light. The goal is to evoke a feeling or impression rather than to clearly depict a recognizable image of the self. This genre allows for a high degree of experimentation and artistic freedom, focusing on the visual elements of the photograph.In this style, the human form might be distorted, fragmented, or suggested through shadows, lines, and shapes.
The emphasis shifts to the abstract qualities that can be derived from the self and its interaction with light and composition.Here are some techniques for creating abstract self-portraits:
- Focus on Form and Shape: Experiment with close-ups of body parts, unusual angles, or intentional camera movement to create interesting shapes and lines. The curve of a shoulder, the texture of skin, or the shadow cast by a limb can become the primary subject.
- Texture Exploration: Highlight the textures of your skin, hair, clothing, or surrounding materials. Macro photography or shallow depth of field can isolate and emphasize these tactile qualities.
- Color as Emotion: Use color to convey mood or emotion. Bold, saturated colors might express energy or passion, while muted or monochromatic tones could suggest introspection or serenity.
- Light and Shadow Play: Manipulate light to create dramatic shadows and highlights that obscure or reveal parts of your form. This can lead to intriguing, almost sculptural effects.
- Blur and Motion: Employ long exposures or intentional camera movement to create abstract blurs and streaks of light, transforming the recognizable into the ethereal.
Dramatic or Cinematic Self-Portraits
Dramatic or cinematic self-portraits aim to evoke a strong emotional response and tell a story with a sense of narrative tension, mood, and visual flair, much like a scene from a film. These portraits often utilize specific lighting techniques, expressive posing, and carefully chosen settings to create a powerful and engaging visual experience. The emphasis is on creating a compelling atmosphere and a sense of intrigue.The elements that define a dramatic or cinematic self-portrait often work in concert to immerse the viewer in a particular moment or emotion.Key elements that contribute to a dramatic or cinematic self-portrait include:
- Lighting: This is paramount. Think about chiaroscuro (strong contrasts between light and dark), Rembrandt lighting, or dramatic side lighting to sculpt the face and create mood. Backlighting can create a halo effect or silhouette, adding to the drama.
- Mood and Atmosphere: The overall feeling of the image is crucial. This can be achieved through lighting, color grading, setting, and expression. Is it suspenseful, melancholic, heroic, or mysterious?
- Expression and Emotion: A strong, deliberate expression is vital. This could be a steely gaze, a look of vulnerability, intense concentration, or a subtle hint of an unspoken story.
- Composition: Use strong lines, leading lines, rule of thirds, or even off-center compositions to guide the viewer’s eye and create visual interest. Framing the subject within a doorway or window can add depth and narrative.
- Narrative Implication: The image should suggest a story or a moment in time. The viewer should feel like they are witnessing a scene unfolding, prompting questions about what happened before or what might happen next.
- Props and Setting: Carefully selected props and a fitting setting can significantly enhance the cinematic quality. A vintage object, a specific architectural element, or even weather conditions can contribute to the narrative and mood.
Overcoming Challenges in Self-Portraiture

Embarking on the journey of creative self-portraiture is an incredibly rewarding experience, but it’s natural to encounter a few hurdles along the way. This section is dedicated to providing practical solutions and insightful strategies to help you navigate common technical difficulties, conquer self-consciousness, and reignite your creative spark. By addressing these challenges head-on, you can elevate your self-portraits from mere snapshots to compelling works of art.Self-portraiture, by its very nature, involves a unique set of technical and psychological considerations.
Unlike shooting a subject, you are both the artist and the muse, requiring a different approach to planning, execution, and self-reflection. This guide aims to equip you with the knowledge and confidence to overcome these obstacles and produce truly impactful self-portraits.
Technical Solutions for Common Self-Portrait Issues
Many technical challenges in self-portraiture stem from the need to control the camera remotely and ensure accurate focus and exposure. Fortunately, a range of tools and techniques can effectively address these common problems.Here are some solutions to prevalent technical issues:
- Autofocus Failures: When your camera struggles to lock focus on you, especially in low light or with busy backgrounds, utilize manual focus. Set your camera to manual focus (MF) and pre-focus on the spot where your eyes will be. Alternatively, use a tripod and a remote trigger or timer, and then step into the frame. For precise focus, consider using a wide aperture and a shallow depth of field, and aim to place your eyes as the sharpest point in the image.
- Inconsistent Exposure: Variations in lighting can lead to over or underexposed images. Employ a gray card or a white object in your test shots to help the camera meter the scene accurately. Shooting in manual (M) mode gives you complete control over aperture, shutter speed, and ISO, allowing for consistent results. If using aperture or shutter priority, use exposure compensation to fine-tune the brightness.
- Camera Shake: Even with a tripod, slight vibrations can blur images. Use a remote shutter release, a smartphone app connected to your camera, or the camera’s self-timer to avoid touching the camera during the exposure. Ensure your tripod is stable and on solid ground.
- Limited Field of View: When you can’t see the entire frame to compose your shot, use your camera’s live view on a smartphone or a tethering cable connected to a laptop. This allows you to see exactly what the camera sees and adjust your position and composition accordingly.
Strategies for Overcoming Self-Consciousness and Projecting Confidence
The act of photographing oneself can bring about feelings of self-consciousness. However, with the right mindset and techniques, you can transform these feelings into powerful expressions of self-assurance. The key lies in shifting your focus from perceived flaws to the narrative and emotion you wish to convey.Cultivating confidence in your self-portraits involves both internal preparation and external execution. Consider these strategies:
- Embrace Your Authentic Self: Instead of trying to emulate others or present an idealized version of yourself, focus on what makes you unique. Celebrate your individuality and allow it to shine through.
- Connect with Your Emotion: Think about the feeling or story you want to tell. When you have a clear intention, your expression and body language will naturally align with it, projecting a sense of purpose and confidence.
- Practice and Experiment: The more you shoot, the more comfortable you will become in front of the camera. Experiment with different poses, expressions, and angles until you find what feels natural and empowering.
- Positive Self-Talk: Before and during your shoot, engage in positive affirmations. Remind yourself of your strengths and the artistic vision you are pursuing.
- Focus on the Art, Not Just Your Appearance: Remember that a self-portrait is a piece of art. The technical execution, the lighting, the composition, and the narrative are as important, if not more so, than a perceived perfect appearance.
Methods for Finding Inspiration When Feeling Creatively Blocked
Creative blocks are a common occurrence for any artist, and self-portraiture is no exception. When inspiration feels elusive, it’s time to step back, observe, and engage with the world in new ways. These methods are designed to help you break through creative ruts and rediscover your artistic drive.When inspiration wanes, try these approaches to reignite your creative fire:
- Consume Diverse Art Forms: Explore other mediums like painting, sculpture, film, literature, or music. Often, inspiration can be found in unexpected places and can translate beautifully into photography.
- Revisit Your Past Work: Look through your existing portfolio. You might discover themes, styles, or ideas that you can build upon or reinterpret in a new light.
- Engage with Nature and Your Surroundings: Spend time outdoors, observing the play of light, textures, and colors. Your immediate environment can be a rich source of inspiration.
- Experiment with Constraints: Sometimes, limitations can foster creativity. Try shooting with a specific color palette, a single prop, or within a confined space.
- Collaborate (Even with Yourself): Imagine your self-portrait as a character. What is their story? What are their desires? This imaginative exercise can unlock new perspectives.
- Study the Masters: Analyze the work of photographers and artists you admire. Deconstruct their techniques, their use of light, and their storytelling to learn from their approaches.
Troubleshooting Guide for Common Self-Portrait Issues
This guide provides quick solutions for frequently encountered problems during self-portrait sessions. By having these remedies readily available, you can minimize disruptions and maintain a smooth creative flow.
| Issue | Potential Cause | Solution |
|---|---|---|
| Image is too dark or too bright. | Incorrect exposure settings; challenging lighting conditions. | Use manual mode for precise control; employ exposure compensation; use a gray card for accurate metering; adjust ISO, aperture, and shutter speed. |
| Subject is out of focus. | Autofocus system struggling; shallow depth of field. | Switch to manual focus; pre-focus on the subject’s position; use a wider aperture with careful focus placement; utilize live view for confirmation. |
| Background is distracting. | Busy or cluttered environment; lack of depth. | Simplify the background; use a shallow depth of field to blur it; change your shooting angle; add a plain backdrop. |
| Camera shake or motion blur. | Camera movement during exposure; subject movement. | Use a tripod and remote shutter release/timer; increase shutter speed; ensure stability. |
| Lack of dynamic posing or expression. | Self-consciousness; unsure of how to pose. | Practice in front of a mirror; study pose references; focus on conveying an emotion or story; experiment with subtle movements. |
| Lighting is flat or unflattering. | Direct, harsh light; insufficient light. | Experiment with natural light sources (windows); use reflectors to bounce light; explore off-camera flash or continuous lighting with modifiers; shoot during golden hour. |
Ending Remarks

In conclusion, mastering how to shoot creative self portraits is an enriching endeavor that blends technical skill with profound personal expression. By embracing the principles of conceptualization, thoughtful composition, strategic lighting, and dedicated post-processing, you can unlock a powerful new dimension in your photographic practice. This guide has provided a robust framework to inspire your creativity, overcome challenges, and ultimately, to craft self-portraits that not only capture your likeness but also reveal your inner world with striking authenticity and artistic vision.